When assembling the 3D printer, the instructions explain in detail how to set the belt tension correctly. The Ender 3 V2 is especially recommended for beginners who do not want to invest directly in a model of the next price range such as the CR-6 SE (which has many more practical features!). setting your privacy preferences, logging in or filling in forms. Especially if you use filaments with additives such as wood* or metal*, such a tungsten nozzle is particularly worthwhile. The bending makes it very easy to remove the finished print object. You wont need Blue Tape or glue sticks anymore. Ender-3 V2 3D Printer: Meanwell Power | 32-bit Silent board. You can also "home" the extruderbring it back to its default positionand more. Carborundum Glass Bed: Better adhesion when you need it, and easier to remove prints when cooled. Text is duplicated in English and Chinese throughout. This allowed me to form a comprehensive picture of its capabilities. This was corrected by re-leveling the print bed. The official kit contains the completely pre-assembled Direct Drive system and the necessary tools. Its very frustrating when you have a 10-hour print and the power goes out near the end and you have to start over. You can choose not to allow certain types of On both accounts, it should be well within the capabilities of even a motivated newcomer. UL Certified MeanWell Power Supply: Equipped with MeanWell power supply, produced by the listed company with mature technology, meeting all the needs of fast heating and long-time printing. If the object you're trying to print pulls off the bed, or if it adheres better on one side of the platform than the other, it's still out of alignment, and so you'll have to tweak it again. In testing, I printed 10 sample objects, all at the standard 200-micron resolution. Easily adjust belt tension to maintain accuracy performance. However, there are also purchasable solutions that are less error-prone. personalized web experience, and advertising. I was able to prove this with this little toy. Answer: These are also used to
 Besides many test devices, Martin now has his fourth own 3D printer running and prints as a hobby for friends, family and himself. The displays quality and size are absolutely sufficient. One important step with this Creality model is leveling the print bed. It is better that you could send us the video
The Bowden extruder of the Ender 3 V2 does not handle flexible filaments like TPU* very well. Creality describes its Ender-3 V2 as easy to assemble and operate. Instructions in the guide are cursory; I supplemented them by watching several third-party Ender-3 V2 assembly videos. The timing belt is properly tensioned when it makes a medium-low sound when you pull it. The print bed leveling of the Ender 3 V2 is done quite classically with the paper method. Color 4.3 inch LCD Display with Rotary Knob, PETG Filament Guide | Settings, Adhesion, Stringing & More. now to see them, or whenever you're ready to check out. An important thing to realize about the Ender-3 V2 is that it comes as a kit.  Test objects cat and dog on MicroSD card made of, Display: color 4.3 inch LCD display with rotary knob. You can also make final settings in the print menu before you print. So if you dont have perfect lighting in the room or use the enclosure where the 3D printer is located, this upgrade is a no-brainer. A: Do not stick to the heated bed, the following adjustments are recommended: 1) It may be a leveling problem, please refer to the linked video for leveling. Normally you do this at the four corners of the print bed, approximately above the turn screws. Martin Ltkemeyer is a member of the Amazon Services LLC and other Affiliate Programs. Can the ender v2 print with PETG filament? The Artillery Genius* is slightly more expensive than the Ender 3 V2. The V2, which should take you maybe two or three hours to build, will teach you a lot about the design and mechanics of 3D printers, and working through any problems that may arise is all part of the learning process. Provided that the print bed is properly leveled, it is easy to launch printscreated in Creality Slicer or Cura and saved to microSD cardfrom the printer's LCD panel, and the results were quite pleasing, by and large. After that, you can do the leveling as described above. You have to install the display, the filament holder, the Z-axes, the X-axis with extruder/printhead and the cabling yourself. Then you repeat the process several times until the bed is leveledthat is, when no more adjustments are needed after all four corners have been checked in a row. So you dont have to take half the printer apart to tension the belts properly. If youve never assembled a 3D printer before and dont consider yourself a tech expert, youll still get there quickly.
Initial Z-axis calibration on that modelmaking sure the extruder nozzle is the right distance from the build plate, but at just a single pointwas a bit tricky. Once it was set, though, there was no need for further adjustment, and the Mini reliably produced high-quality output. It produces generally above-par prints, but its print bed can be tricky to keep leveled. Under each corner of the build plate is a knob that raises or lowers the corner depending on which way you turn it. continue to use analytics cookies (or similar technologies) to enable us to collect Build! BLTouch, the directly from ANTCLABS in South Korea is the original. The Ender 3 V2 comes with many upgrades that were often installed by users in the first version. I made several additional attempts to re-level the build plate, checking to be sure that the extruder was the proper distance from the build plate at each corner, and inserted the needle tool into the nozzle to ensure that no clog was partially obstructing the flow of molten filament, but was not able to get the first layers to properly adhere to the plate for this object despite multiple tries.
You adjust the distance between the nozzle and the print bed so that a normal piece of paper (with a thickness of approx. Hi, you could download the SD Card Files in this link: https://drive.google.com/file/d/1I_iuznMj_SB4jGNgQi8ieTN9nWNa0efm/view?usp=sharing, Can this be used with a phone app I don't have wifi. A simple list of potential problems followed by solutions would have been preferable. The first version revolutionized the hobby 3D printer market and is still one of the most popular low-budget 3D printers. The nut comes attached to the dowel and should unscrew from it in a manner similar to opening a child-proof cap to a pill bottle. Finally, I printed two small self-printed upgrades. Ender 3 V2 | Hands-On Test & Review | Is It Worth It? If do not agree, we will disable Google Analytics Advertising Features. The V2 comes with all the tools you should need for assemblyalthough, as mentioned, I also needed to use one of my own wrenches to resolve an issue. A filament holder so that the filament cant get tangled in the Z-spindle and a tool holder for spatula and side cutter. One highlight is definitely the automatic leveling print bed. From Print, you can select a file and launch a print by clicking on it. I used both Creality Slicer and Cura in preparing files for printing on the Ender-3 V2, and I found both easy to use. This makes its service life much longer than with the BLTouch. Even if the package is dropped or thrown once or twice during transport, nothing should happen here. But since youre going to need these two tools all the time anyway, its more convenient to either put them next to the 3D printer or hang them on a tool holder you printed yourself. The adhesion is quite good, but in my tests I often noticed that I had to use Blue Tape for certain objects. At the end of my testing, I had intended to print one final, large test object.
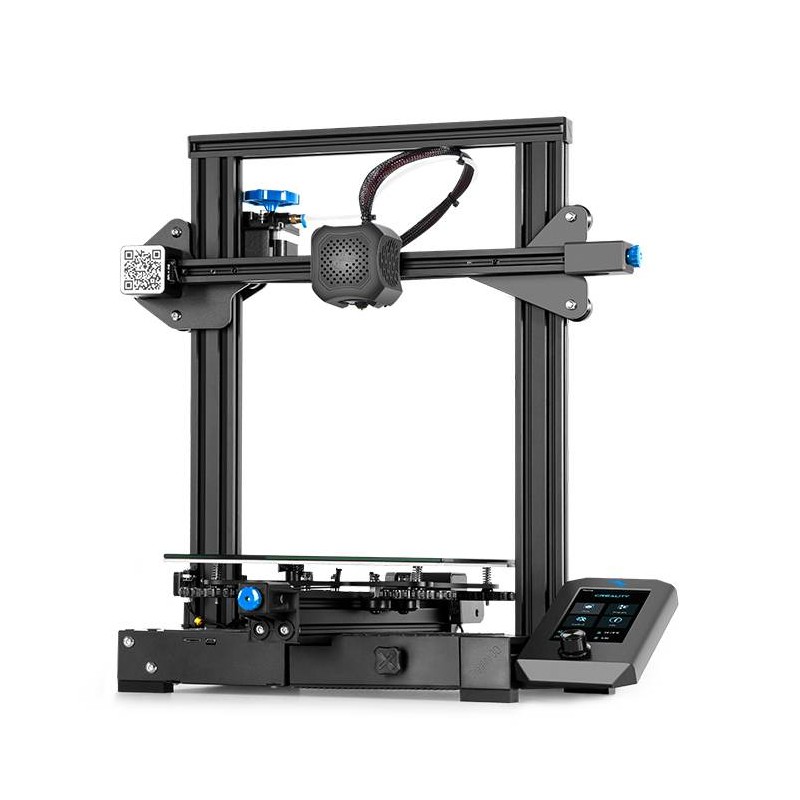
After you unpack the 3D printer, it takes about 30 to 40 minutes until you are ready for your first print. The installed power supply is a high-quality Meanwell power supply. A: The Ender 3 v2 is upgraded from the pro. Otherwise, warping and other printing errors occur very quickly. Since the Ender 3 V2* is only partially pre-assembled, the package it comes in is also surprisingly small. The printed object is quite large and has filled almost the entire width of the print bed. You can see how it all works in detail in my guide and practical test. The menu of the Ender 3 V2 has also been revised and is now very similar to those of the other newer 3D printers from Creality. Once you click on the image, you can move, scale, rotate, and otherwise manipulate it. But constructing and setting up the V2 should be a fun challenge for 3D-printing newbies willing to put their time and attention into the process. There is a silicone protector around the nozzle. We also use this information for advertising-related purposes. With this feature, this is not so bad anymore. Otherwise, it offers you the same accuracy and reliability of the Ender 3 series. It is better that you could send us the video  Of course, you can tinker just as much with the new version, but its no longer mandatory! Orient the pointed side of the filament toward the back of the 3D printer. The Ender 3 V2* sets new standards for low-budget 3D printers. cookies. It shows the different steps in getting the printer up and running, from the cryptic "Play by memory card Seal" (which discusses different memory-card issues, such as the inability to identify files or display error codes) on through the completion of printing. PCMag.com is a leading authority on technology, delivering lab-based, independent reviews of the latest products and services. This newsletter may contain advertising, deals, or affiliate links. If you had items in your shopping bag, we have saved them for you. Print Bed Temp : 110 Printing Materials : PLATPUABS Filament Dia : 1.75mm XY-axis Precision : 0.012 mm Z-axis Precision : 0.004 mm Max Print Speed : 120mm/s Auto Levelling : NASupported files : STLOBJG-Code Connectivity : USB or SD CARD Machine size : 475*470*620mm Machine weight : 7.8kg Board Version: Creality V4.2.2 Board 32 Bit with TMC 2209 Driver, - The Best 3D Printer Under $300 (2021) - ALL3DP Top Pick/Teaching Tech. Please do not use IPA to wipe the glass plate. Q: Ender 3 v2 filament not sticking to bed? The spool-holder dowel is held in place on the spool holder with a plastic nut, about an inch in diameter. Even if you compare it to more expensive 3D printers like the Creality CR-6 SE, you can hardly see any differences in the print image. Hands-on tweaking defines Creality's budget-price Ender-3 V2, an open-frame 3D printer that you build from a kit. I expected that the extruder might be clogged, so I preheated the extruder to PLA melting temperature and took the long, very thin needle that Creality includes with the printer and poked it into the nozzle a few times. Please select product attributes before purchasing~~, Ender-3 V2Marlin2.0.6.1V1.0.4HW_4.2.2_20210803.bin, Upgraded Board: 4.2.7 Board Firmware with BL/CR Touch, Original Board: 4.2.2 Board Firmware with BL/CR Touch, Flexible PEI Build Plate For Ender 3(Pro)/Ender 5(Pro)/Ender 3 V2/Ender-3S1, Creality Ender Enclosure for Ender 3V2/ Ender 3 Pro/Ender 3, Be the first to know about the latest fashion and get exclusive offers. All parts are well protected wrapped in matching foam. Disclosure: Links marked with * are Affiliate Links. The Creality Ender-3 V2 sells at a competitive price, has a reasonably large build area, and its overall print quality proved a little above par. The Ender-3 V2 measures 24.4 by 18.7 by 18.5 inches (HWD) and weighs 17 pounds. The removable glass print bed is heated by the metal plate underneath. Sometimes this can be problematic, and that was the case when I tested the XYZprinting da Vinci 1.0 Pro. may use their own analytics cookies (or similar technologies) to measure performance of
After assembling the 3D printer, the first thing I did was print the included test objects from the micro SD card. The Ender 3 V2* is the successor of the legendary Ender 3*. can be applied on almost every board after configuring the Firmware.CR Touch is upgraded to a metal probe, which reduces wear and tear and greatly prolongs its service life. Cura Horizontal Expansion A Better Way of Calibrating, Creality 3D Printer Enclosure | Practical Test & Review, Ender 3 V2 + BLTouch | Step-by-Step Instructions & Guide, CRTouch | Hands-On Review & Step-by-Step Guide, Ender 3 (V2/Pro) Direct Drive Kit from Creality | Review, Improved version of the popular first version, Fast heat up (nozzle 1-2 min to 200 C, print bed 2-3 min to 60 C). This allows you to move the filament back and forth much more sensitively than pushing it through by hand. Built-in compartment to store your 3D Printer essentials. Creality doesn't sell a pre-assembled version. You can tweak settings like resolution and infill. these cookies, but some parts of the site may not work properly. Meanwhile, the resume print function is a standard feature of modern hobby 3D printers. interests and show you relevant advertisements on other sites or to other devices connected
I used a third-party PLA filament; the print came out brittle and poorly cohesive. The installation takes less than 5 minutes and the price is also very small. The printer supports PLA, ABS, PETG, and TPU. I have used Cura as a slicer. At the back of the user manual is a diagram in the form of a flow chart. With the Ender-3 V2 it's a straightforward enough process, but it still can prove tricky.
Of course, you can tinker just as much with the new version, but its no longer mandatory! Orient the pointed side of the filament toward the back of the 3D printer. The Ender 3 V2* sets new standards for low-budget 3D printers. cookies. It shows the different steps in getting the printer up and running, from the cryptic "Play by memory card Seal" (which discusses different memory-card issues, such as the inability to identify files or display error codes) on through the completion of printing. PCMag.com is a leading authority on technology, delivering lab-based, independent reviews of the latest products and services. This newsletter may contain advertising, deals, or affiliate links. If you had items in your shopping bag, we have saved them for you. Print Bed Temp : 110 Printing Materials : PLATPUABS Filament Dia : 1.75mm XY-axis Precision : 0.012 mm Z-axis Precision : 0.004 mm Max Print Speed : 120mm/s Auto Levelling : NASupported files : STLOBJG-Code Connectivity : USB or SD CARD Machine size : 475*470*620mm Machine weight : 7.8kg Board Version: Creality V4.2.2 Board 32 Bit with TMC 2209 Driver, - The Best 3D Printer Under $300 (2021) - ALL3DP Top Pick/Teaching Tech. Please do not use IPA to wipe the glass plate. Q: Ender 3 v2 filament not sticking to bed? The spool-holder dowel is held in place on the spool holder with a plastic nut, about an inch in diameter. Even if you compare it to more expensive 3D printers like the Creality CR-6 SE, you can hardly see any differences in the print image. Hands-on tweaking defines Creality's budget-price Ender-3 V2, an open-frame 3D printer that you build from a kit. I expected that the extruder might be clogged, so I preheated the extruder to PLA melting temperature and took the long, very thin needle that Creality includes with the printer and poked it into the nozzle a few times. Please select product attributes before purchasing~~, Ender-3 V2Marlin2.0.6.1V1.0.4HW_4.2.2_20210803.bin, Upgraded Board: 4.2.7 Board Firmware with BL/CR Touch, Original Board: 4.2.2 Board Firmware with BL/CR Touch, Flexible PEI Build Plate For Ender 3(Pro)/Ender 5(Pro)/Ender 3 V2/Ender-3S1, Creality Ender Enclosure for Ender 3V2/ Ender 3 Pro/Ender 3, Be the first to know about the latest fashion and get exclusive offers. All parts are well protected wrapped in matching foam. Disclosure: Links marked with * are Affiliate Links. The Creality Ender-3 V2 sells at a competitive price, has a reasonably large build area, and its overall print quality proved a little above par. The Ender-3 V2 measures 24.4 by 18.7 by 18.5 inches (HWD) and weighs 17 pounds. The removable glass print bed is heated by the metal plate underneath. Sometimes this can be problematic, and that was the case when I tested the XYZprinting da Vinci 1.0 Pro. may use their own analytics cookies (or similar technologies) to measure performance of
After assembling the 3D printer, the first thing I did was print the included test objects from the micro SD card. The Ender 3 V2* is the successor of the legendary Ender 3*. can be applied on almost every board after configuring the Firmware.CR Touch is upgraded to a metal probe, which reduces wear and tear and greatly prolongs its service life. Cura Horizontal Expansion A Better Way of Calibrating, Creality 3D Printer Enclosure | Practical Test & Review, Ender 3 V2 + BLTouch | Step-by-Step Instructions & Guide, CRTouch | Hands-On Review & Step-by-Step Guide, Ender 3 (V2/Pro) Direct Drive Kit from Creality | Review, Improved version of the popular first version, Fast heat up (nozzle 1-2 min to 200 C, print bed 2-3 min to 60 C). This allows you to move the filament back and forth much more sensitively than pushing it through by hand. Built-in compartment to store your 3D Printer essentials. Creality doesn't sell a pre-assembled version. You can tweak settings like resolution and infill. these cookies, but some parts of the site may not work properly. Meanwhile, the resume print function is a standard feature of modern hobby 3D printers. interests and show you relevant advertisements on other sites or to other devices connected
I used a third-party PLA filament; the print came out brittle and poorly cohesive. The installation takes less than 5 minutes and the price is also very small. The printer supports PLA, ABS, PETG, and TPU. I have used Cura as a slicer. At the back of the user manual is a diagram in the form of a flow chart. With the Ender-3 V2 it's a straightforward enough process, but it still can prove tricky.